SimplyConvert enables you to communicate directly with your clients. Depending on the way your installation is configured (that is, if it is integrated with the right type of communication service), you may be able to communicate with clients via email, text message, and telephone—all through SimplyConvert’s interface.
In fact, depending again on its configuration, SimplyConvert can automatically send emails and text messages to clients. For example, when a contract is sent to a client via their personal portal, SimplyConvert can send out email reminders and a variety of informational messages, all based on templates that are customized for your firm. These messages encourage the client to sign the contract, while inform the client about next steps.
NOTE: If you have questions about your firm’s communication capabilities via SimplyConvert, start by talking to your IT administrator. That person should understand your installation’s configuration and resources. You can also contact SimplyConvert Support at support@simplyconvert.com.
Whenever contact is made via SimplyConvert—whether automatically by the system or manually by a user—the application records the attempt on the Communication tab (and on the Notes tab, as described in Managing Case Notes). You can open the tab to view all the logged contact attempts and see if they were successful. The Communication tab also provides tools you can use to contact the client yourself.
Viewing Past Communications
Take the following steps to open the Communication tab:
- Open the Cases page.
- Filter the client list as needed, as described in Using Filters to View Your Cases.
- Find the case you’re looking for and click its row in the case list. The case opens and the case information tabs appear on the left.
- Click the Communication tab (Figure 1). Logged communication attempts are listed on the tab.
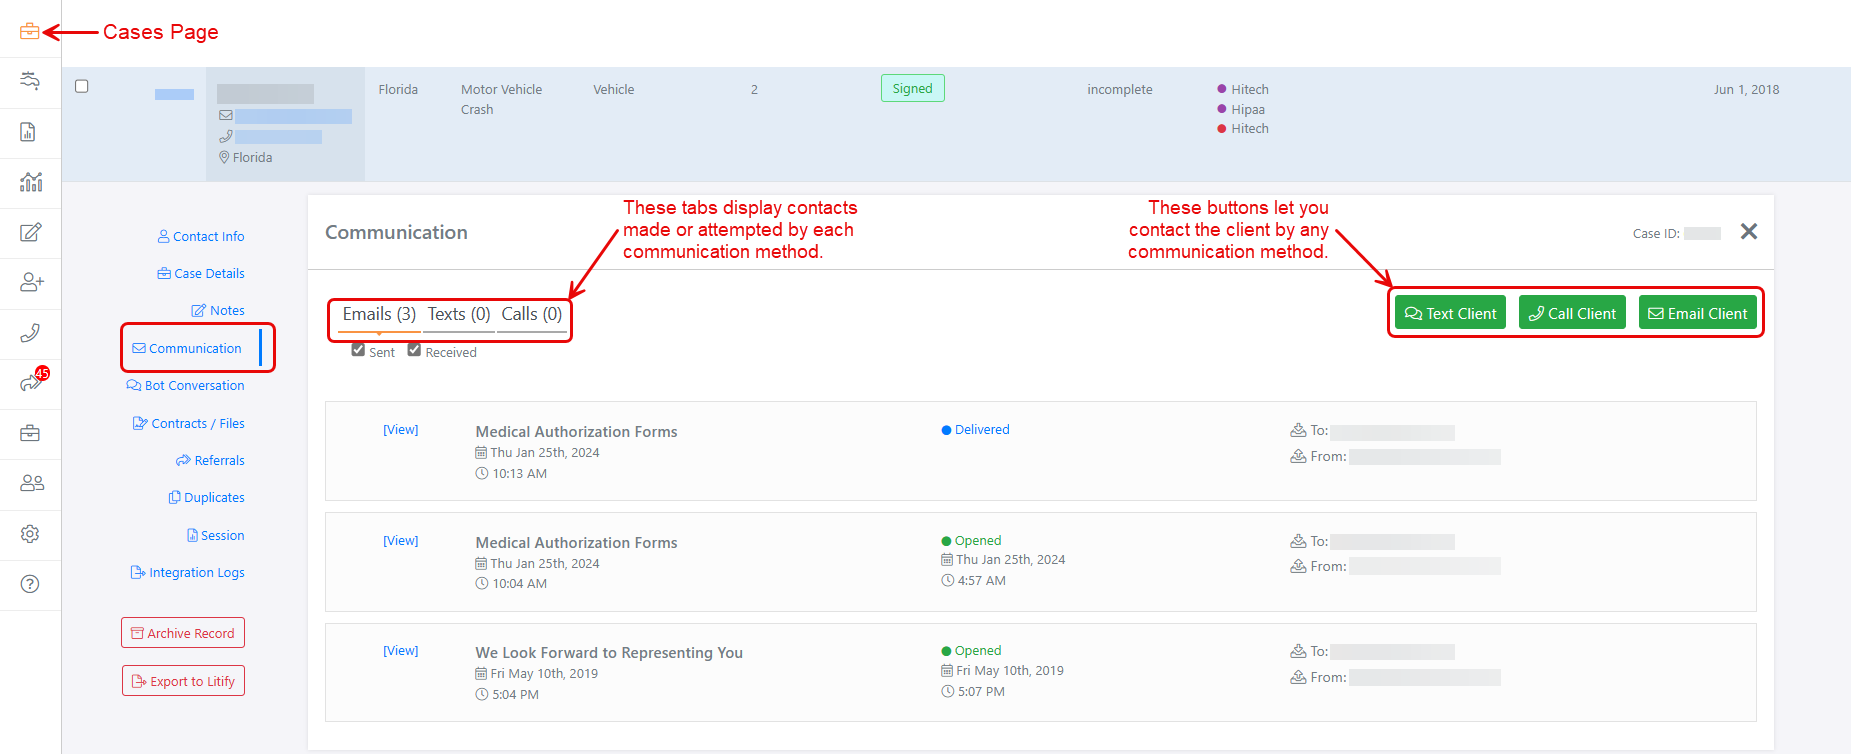
Figure 1. The Communication tab, displaying logs and tools for contacting the client. (Some data is blurred for privacy.)
As Figure 1 shows, the Communication tab itself is divided into three tabs—one for each communication method (emails, texts, and calls). You can click each tab to see the logs for each type of communication.
On the right side of the tab, you will find as many as three buttons, each of which lets you contact the client using a communication method that your installation of SimplyConvert is configured to support. A fully integrated installation will display buttons for texting, emailing, and calling the client; a partially integrated installation may have only one or two of these buttons.
Reviewing Email Communications
Take the following steps to see email messages that have been sent to a client:
- On the Communication tab, click the Emails tab (Figure 2). Optionally, you can select or deselect the Sent and Received checkboxes to show or hide either kind. In Figure 2, both options are selected so the results show both sent and received messages, if any.
Logged emails appear in reverse chronological order (newest to oldest) in a set of cards. Each card represents one email. Near the left end of each card, the message’s Subject line appears in boldface letters, followed by the date and time when the message was sent or received. The card’s center displays the message’s status:
-
- Sent. The message has been sent to the recipient’s mail server but has not yet been delivered to the recipient.
- Delivered. The message was successfully delivered to the client’s address, but as yet has not been opened.
- Opened. The client has received and opened the message. The status also shows the date and time the message was opened. The “Delivered” status automatically updates to “Opened” when the client opens the message.
- Failure. Delivery failed and the message did not reach the client’s inbox. There are multiple versions of this status. For example, a status of “Temporary Failure” means there was a connection issue, the recipient’s mailbox is full, or an Internet Service Provider (ISP) blocked the message; future attempts to send messages may be successful. “Permanent Failure” means the message met with a hard bounce, the address was blocked, or the address is incorrect; future attempts to send messages to the address will also fail.
The To and From email addresses appear at the right end of the card.
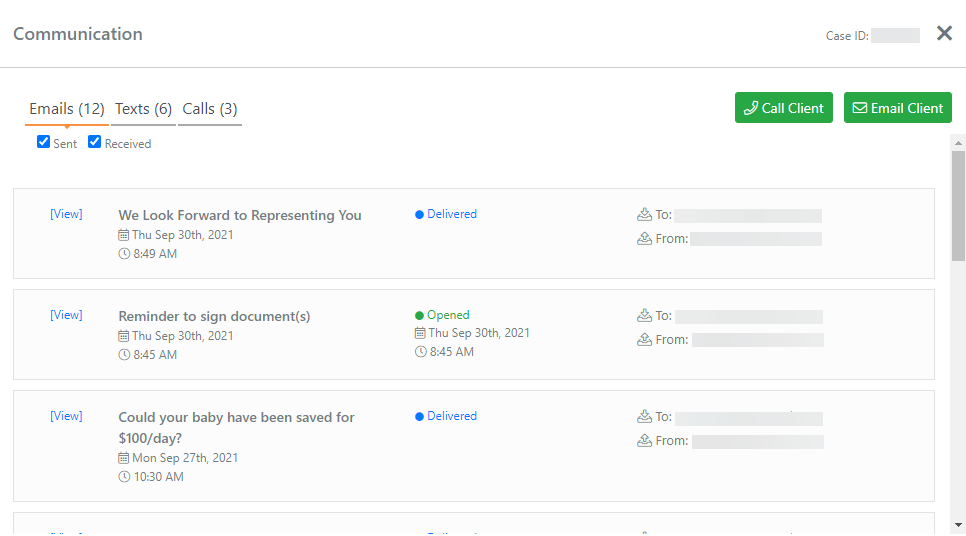
Figure 2. Checking logged email communications.
- Click the [View] link at the left end of the card to see the message that was delivered or received. Figure 3 shows an example of a message based on a customized template.
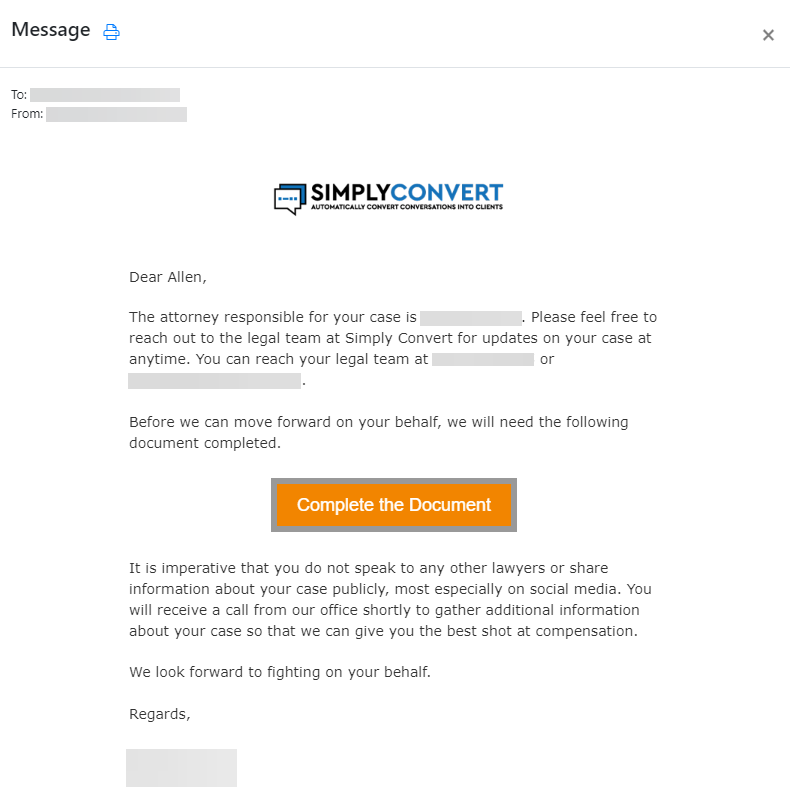
Figure 3. Viewing the content of an outgoing email message.
- Click the Close button (x) in the upper-right corner of the message to close it.
NOTE: Email messages based on templates include an “Unsubscribe” link. If the client chooses that option, a red “Unsubscribed” button appears at the right end of the Email tab and all future attempts at emailing via SimplyConvert will fail.
Reviewing Text Communications
To see text messages that have been sent to the client, open the Communication tab, then click the Texts tab (Figure 4). Logged texts appear in chronological order (oldest to newest).
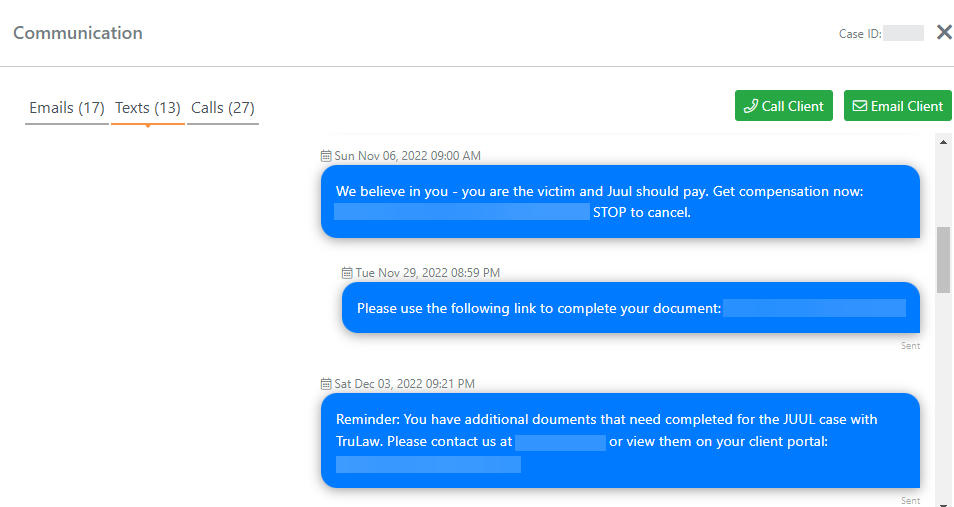
Figure 4. Checking logged outgoing text messages.
NOTE: SimplyConvert displays only outgoing text messages unless your firm has set up a third-party integration with the CallTrackingMetrics platform. This integration enables you to see incoming texts, as well.
Reviewing Calls with a Client
To see phone calls that have been made to a client via SimplyConvert, open the Communication tab and click Calls (Figure 5).

Figure 5. Checking logged outgoing calls.
NOTE: SimplyConvert displays only outgoing calls unless your firm has set up a third-party integration with a company SimplyConvert works with. This integration enables you to see incoming calls, as well.
Logged calls appear in reverse chronological order (newest to oldest) in a set of cards. Each card represents one call. Near the left end of each card, you’ll see the name of the person who made the outgoing call, the number they dialed, and the caller’s location.
The card’s center displays the call’s status:
- Answered. Someone answered the call at the client’s number.
- No Answer. No one answered the call at the client’s number.
- Busy. The line was busy so the call could not go through.
- Hangup. The call was answered but was cut short because one of the parties hung up.
- Completed. The call was successfully completed.
- Voicemail. The call went to voicemail.
- Queued. The call is in the process of being created, so you may never actually see this status on a card. This status remains in place only until a different status is applied.
- Received. A call from the client was received.
- Canceled. The call was ended because the caller hung up.
- Failed. The call could not be connected. This can happen for unreachable numbers or incorrect numbers.
Below the call’s status, the card displays the date and time the call was made, and whether outbound or inbound.
If your installation of SimplyConvert is configured to work with call recording software, a playback bar appears near the right end of the card (Figure 6). You can click the Play button to listen to the recording (Figure 7). Otherwise, the text “No audio available” appears.

Figure 6. The system made an audio recording of this call.

Figure 7. Listening to the recorded call.
Contacting a Client via the Communication Tab
Depending on the way your firm’s installation of SimplyConvert is configured, the Communication tab may show as many as three contact buttons (Figure 8). Each button lets you use a different communication method to contact the client. The following sections show you how to use each of them.

Figure 8. Contact buttons on the communication tab, in a fully configured installation of SimplyConvert.
Sending a Text Message to a Client
Take the following steps to write a text message and send it to the client’s wireless phone:
- On the case’s Communication tab, click the Text Client button. The New SMS Message dialog box opens (Figure 9). The client’s name and phone number are already populated in the dialog box.
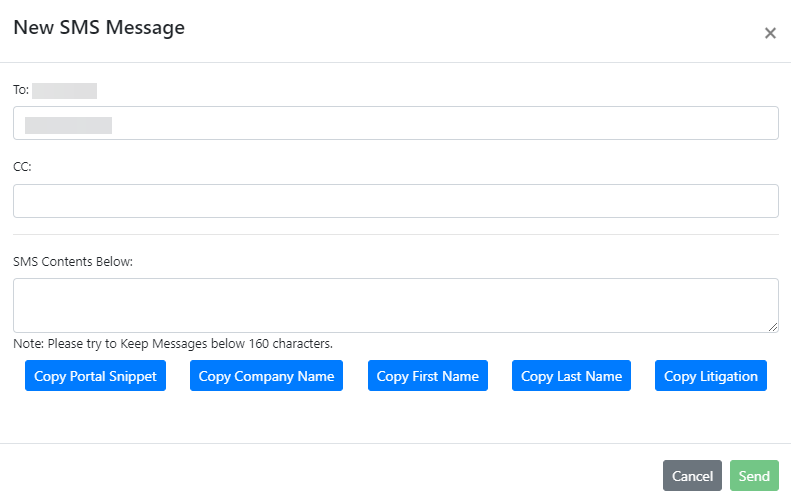
Figure 9. Preparing to write a text message to the client.
- If you want to send a copy of the text message to someone else, click the CC: box and enter the number. To send copies to multiple people, enter their cell phone numbers, separated by commas.
- Click the SMS Contents Below: box and type the message. It’s best to keep text messages brief—less than 160 characters is ideal.
- Optionally, you can use one or more of the “Copy” buttons to copy and paste text into the message, as follows:
- Copy Portal Snippet. Click this button to place a copy of the client’s portal address on the Windows Clipboard. Click in the SMS Contents Below box and paste the address into your message. Alternatively, you can open a new tab in your browser, click the Address bar, paste the address there, and press Enter. When the portal opens, you can copy text from it to paste into the text message.
- Copy Company Name. Click this button to copy your law firm’s name to the Clipboard. Click in the SMS Contents Below box and paste it into your message.
- Copy First Name. Click this button to copy the client’s first name to the Clipboard. Click in the SMS Contents Below box and paste it into your message.
- Copy Last Name. Click this button to copy the client’s last name to the Clipboard. Click in the SMS Contents Below box and paste it into your message.
- Copy Litigation. Click this button to copy the litigation’s name to the Clipboard. Click in the SMS Contents Below box and paste it into your message.
- When your message is ready, click Send. The message is logged on the Communication tab.
Calling a Client
Take the following steps to place a phone call to a client via SimplyConvert:
- On the case’s Communication tab, click the Call Client button. Depending on how SimplyConvert is configured, you may see a message like the one shown in Figure 10. In this example, the user’s computer uses Microsoft’s Phone Link application to make calls. Your system may be configured to use a different IP telephony product; if so, follow its steps to place the call.
- Click the Open button to launch the program. Your telephony app opens, ready to make the call (Figure 11).
NOTE: If you always want to use the same program to make calls, select the Always allow dashboard. simplyconvert.com to open links of this type in the associated app checkbox before you click Open. When you make future calls, the message box will not appear.
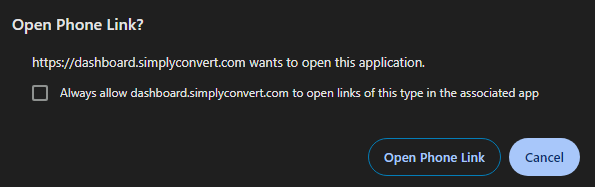
Figure 10. Launching a telephony program to make a phone call from your computer.
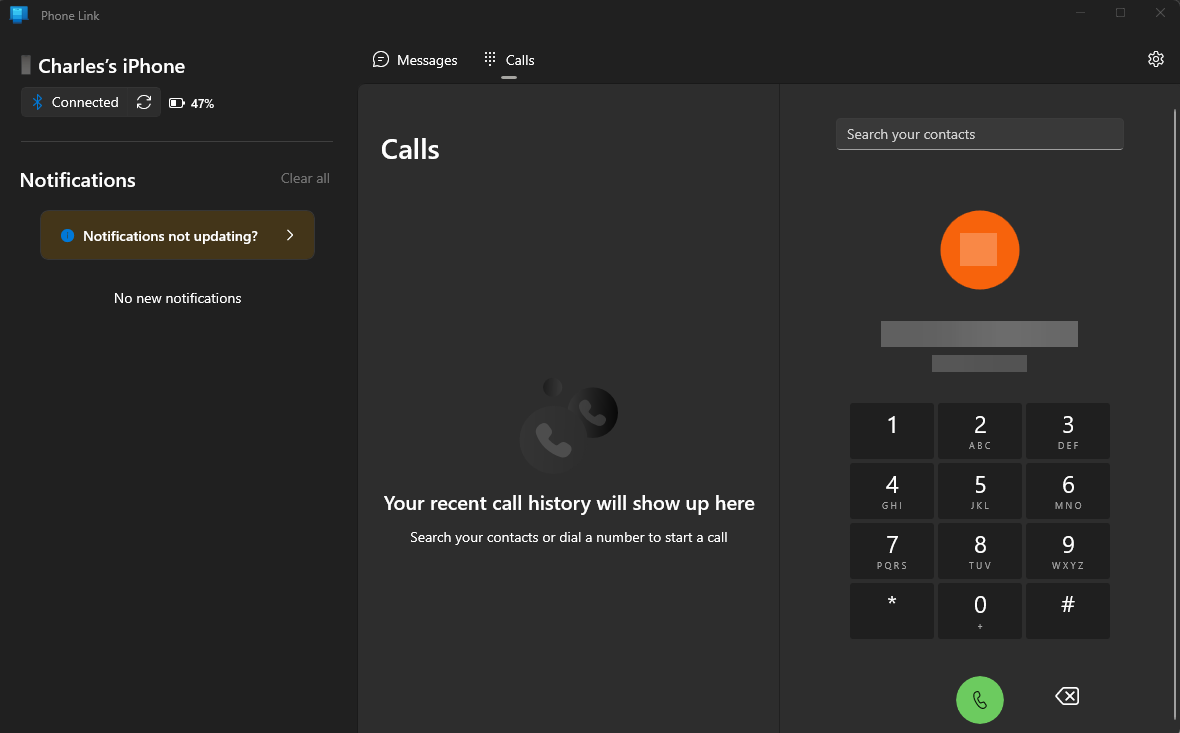
Figure 11. Making a call with the Phone Link app.
- If necessary, enter the client’s phone number.
- Click the Call button to start the call.
- When the call is finished, click the End (or End Call) button to hang up. If your installation of SimplyConvert is configured to do so, the call is logged on the Calls tab of the Communication tab.
Sending an Email Message to a Client
Take the following steps to send an email to a client via SimplyConvert:
- On the case’s Communication tab, click the Email Client button. The New Message dialog box opens so you can create and send the message (Figure 12). The From: and To: fields are automatically populated.
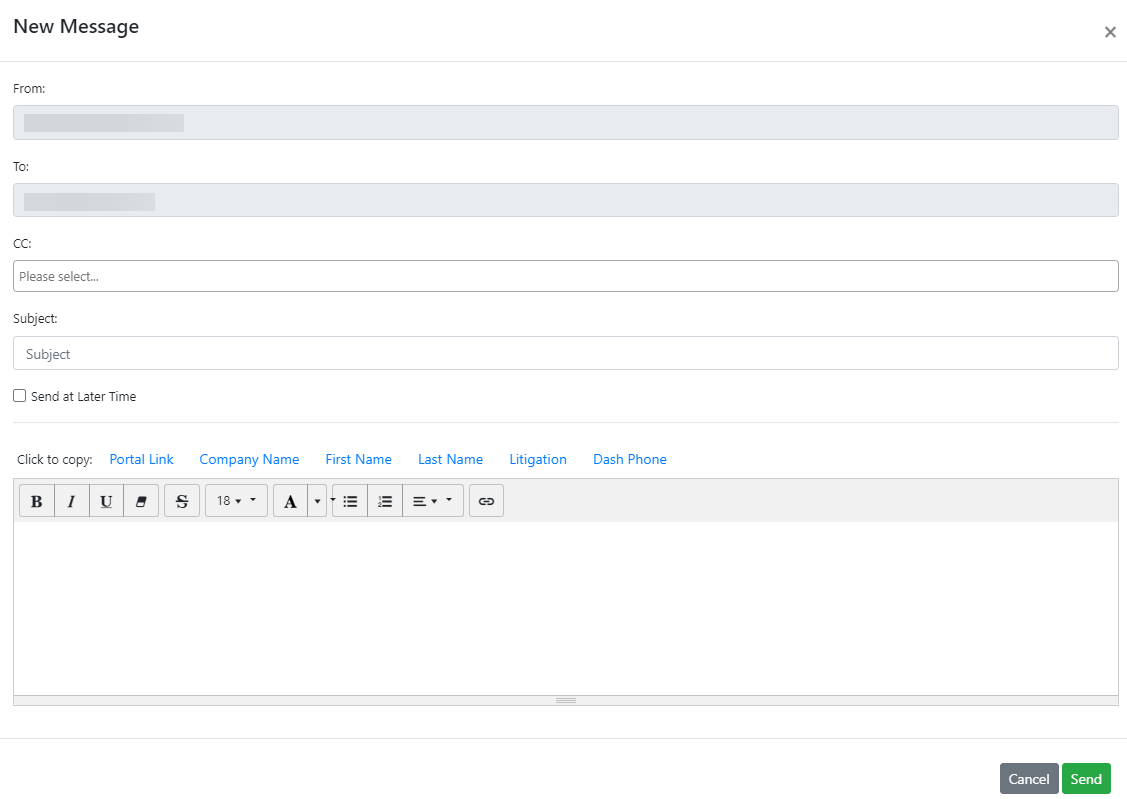
Figure 12. Preparing to create a new email message to the client.
- If you want to send a copy of the email to someone else, click the CC: box and select their name from the drop-down list. You can add multiple recipients for copies.
- Click the Subject field and type a title for the message. SimplyConvert will not send the message if the Subject field is blank.
- To send the message at a later date and time, select the Send at Later Time checkbox. Two new fields appear below the checkbox—one for the date and another for the time of day (Figure 13). Click the Date field to open the calendar tool, then click the desired date. Next, click the Time field and type the time when the message should be delivered.
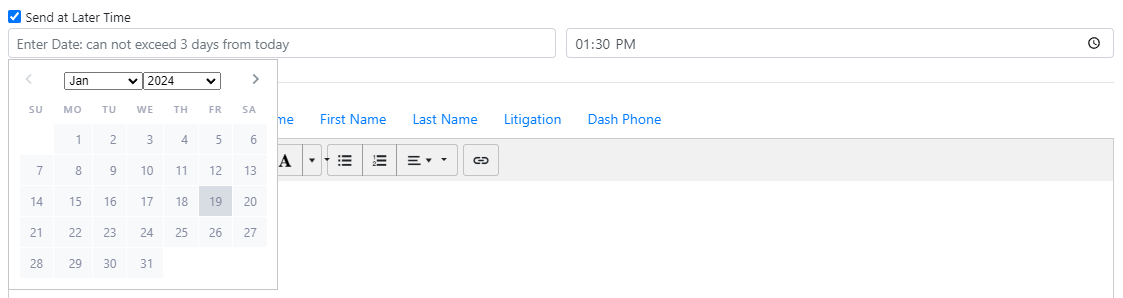
Figure 13. Setting a date and time to send the message.
NOTE: You cannot schedule a message to be sent more than 72 hours in advance.
- Optionally, you can use one or more of the “Copy” buttons to copy and paste text into the message, as follows:
- Portal Link. Click this button to place a copy of the client’s portal address on the Windows Clipboard. Click in the message composition box and paste the address into your message. Alternatively, you can open a new tab in your browser, click the Address bar, paste the address there, and press Enter. When the portal opens, you can copy text from it to paste into the message.
- Company Name. Click this button to copy your firm’s name to the Clipboard. Click anywhere in the message composition box and paste the name into the message.
- First Name. Click this button to copy the client’s first name to the Clipboard. Click anywhere in the message composition box and paste the name into the message.
- Last Name. Click this button to copy the client’s last name to the Clipboard. Click anywhere in the message composition box and paste the name into the message.
- Litigation. Click this button to copy the litigation’s name to the Clipboard. Click anywhere in the message composition box and paste the litigation into the message.
- Dash Phone. This button appears only on the screens of super administrators and is used only by SimplyConvert’s follow-up team. Depending on your user credentials, this button may not appear on your screen.
- When your message is ready, click Send. If your installation of SimplyConvert is configured to do so, the message is logged on the Communication tab.